| 1. General
1.1 What are Photo Lith, Photo Lith
Posteriser and Photo Lith -Black & White?
1.2 What file types are supported?
1.3 Do these programs change the size of my
image?
1.4 Why do I get a malicious script
warning when I run these programs?
1.5 Why are Photo Lith and Photo Lith Posteriser
very slow?
1.6 What is this Brightness Table that gets
created?
1.7 Why don't I get an image preview from
my file?
1.8 Are these applications colour managed?
1.9 Why is there no Print option in any of
these applications?
1.10 What other libraries were used in making
Photo Lith?
2. Photo Lith
2.1 What are the controls for Photo
Lith?
3. Photo Lith Posteriser
3.1 What are the controls for Photo
Lith Posteriser?
4. Photo Lith - Black & White
4.1 What are the controls for Photo
Lith - Black & White?
4.2 How do I create a sepia toned image with
Photo Lith - Black & White?
1. General
1.1 What are Photo Lith, Photo Lith Posteriser and
Photo Lith - Black & White?
Photo Lith is an image processing program that can
produce images that were previously produced in a darkroom
using lith film, a very high contrast film, without mucking
about with chemicals, finding a darkroom and without waiting
ages and trying again and again to get the effect you were
looking for. I always liked these type of images but as I
got older I enjoyed the darkroom less and less and I had a
computer so I wrote Photo Lith to save me time and money.
I also decided to make it freely available to anyone else
who would like to use it. It is distributed under the GNU
General Public Licence a copy of which is included with the
program or can be viewed here.
One important aspect of this licence is that the software
is supplied as-is and it has no warranty,
you are responsible for any problems you have or any damage
it causes to your system. However, it has been running on
my computer and others without any problems turning up so
far.
Photo Lith Posteriser is a development of Photo Lith. It
allows you to create multicoloured images with up to eight
different colours or, if you want, you can use the original
colours from the image in place of some of the colours. Posteriser
is released under the same licence as Photo Lith and is supplied
as-is and it has no warranty.
Photo Lith - Black & White is an extension of Photo Lith.
It allows the creation of black and white images in a way
that will be familiar to conventional photography. It is simple
and intuitive to use. It is released under the same license
as Photo Lith and is supplied as-is and has no warranty.
[Top of page]
1.2 What file types are supported?
At present Photo Lith and Photo Lith Posteriser only supports
RGB jpeg and uncompressed RGB TIFF files. When saving these
no compression is applied, they are saved at the highest possible
quality. It is intended to add support for other file formats
to future versions.
[Top of page]
1.3 Do these programs change the size of my image?
Although the images displayed on screen will change size when
you resize a window this has no effect on the file that will
be saved, this is purely a display phenomenon. The image that
is saved at the end will have the same resolution and number
of pixels in each direction as the original but as the image
has been altered the size of the file will change.
[Top of page]
1.4 Why do I get a malicious script warning when I run these
programs?
As of version 1.9 this will no longer happen. I have now wrapped
the JAR file in a Windows .exe file that properly sets up
the program without the need for batch and script files. If
you get this I would download the newest version, it doesn't
give the warning and it is better.
Older versions, pre-1.9, under Windows used
a batch file to run Photo Lith. Normally this would lead to
two windows being open when the program is running which I,
personally, do not like. I have, therefore, used another short
batch file and a .vbs script to hide the extra window that
would be visible. The script should only contain one line
of code:
CreateObject("Wscript.Shell").Run
"""" & WScript.Arguments(0) &
"""", 0, False
Open the file invisible.vbs and check this if
you want.
If you would rather not run any scripts you can change the
target of the shortcut to runPL.bat rather than photoLith.bat.
This will not hide the window the batch file is running in
but will have no effect on the running of Photo Lith.
[Top of page]
1.5 Why are Photo Lith and Photo Lith Posteriser very slow?
When these programs start they set the memory of the JVM to
256MB to allow for the handling of large files. If you have
less than 256 MB of RAM windows will be paging causing slow
progress.
When Photo Lith and Posteriser load an image they create a
Brightness Table, see below, for the image this can take some
time to create for a large image and accounts for most of
the delay when opening an image.
To allow changes to be seen quickly both Posteriser and Photo
Lith - Black & White use a smaller preview image to show
you what your results will look like, when you come to save
you images these programs then apply the same settings to
the original image to create the final output before saving
and this accounts for most of the delay when saving images.
[Top of page]
1.6 What is this Brightness Table that
gets created?
The thresholds used in Photo Lith are based
on the brightness of each pixel. To avoid having to calculate
this every time a slider is moved or a new filter selected
Photo Lith does this whenever a new image is loaded to save
time later. Technically it is a HashTable with brightness
values as the keys and Vectors of Point objects that have
this brightness value as values.
[Top of page]
1.7 Why don't I get an image preview
from my file?
Photo Lith will produce previews from Jpeg and
uncompressed TIFF files only. Also if your file is a large
one it can take Photo Lith quite some time to generate the
preview, that's life I'm afraid.
[Top of page]
1.8 Are these applications colour managed?
At present there is no controlable colour management
in any of these applications. However, when opening an image
if it is tagged with an ICC profile Java will convert this
to its working colourspace and save the image in this space
even although the saved image will not be tagged with a profile.
The colourspace used is sRGB. If an image saved from any of
these applications is loaded into a colour managed application
the sRGB profile should be assigned to the
file when it is opened.
[Top of page]
1.9 Why is there no Print option in
any of these applications?
I always get my images output photographically
for the best quality and therefore have not felt the need
to have this option so it is not a priortity. It will be added
in future when time allows.
[Top of page]
1.10 What other libraries were used
in making Photo Lith?
When writing Photo Lith I used the standard
libraries and also the Java
Imaging I/O library, Java
Advanced Imaging and to open the web site I used the following
library from Stephen Ostermiller, http://ostermiller.org/utils/
.
[Top of page]
2. Photo Lith
2.1 What are the controls for Photo
Lith?
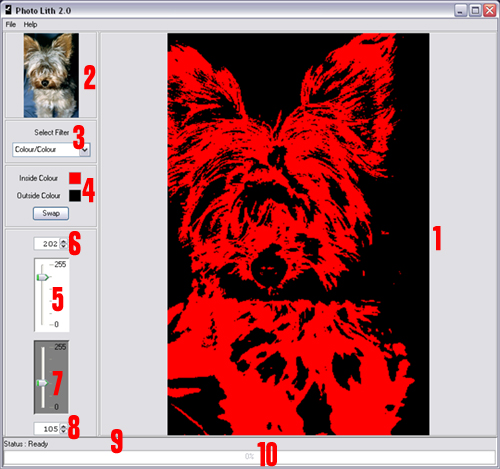
Here is a picture of the user interface for
Photo Lith version 2.0.

1 - The "lith" image that is the result
of the thresholds set and the filter applied.
2 - The original image being processed.
3 - The combo box used to select the required filter.
4 - Colour Select Panel (only visible when needed).
5 - The slider used to set the upper threshold.
6 - The spinner used to fine tune the upper threshold.
7 - The slider used to set the lower threshold.
8 - The spinner used to fine tune the lower threshold.
9 - The Status Bar that informs the user what is happening.
10 - The Progress Bar that indicates how much work has been
done.
The File menu contains options to open and save
images and to exit the program. The Help menu gives access
to the Help system along with the License agreement and a
link to this web site.
[Top of page]
3. Posteriser
3.1 What are the controls for Photo
Lith Posteriser?
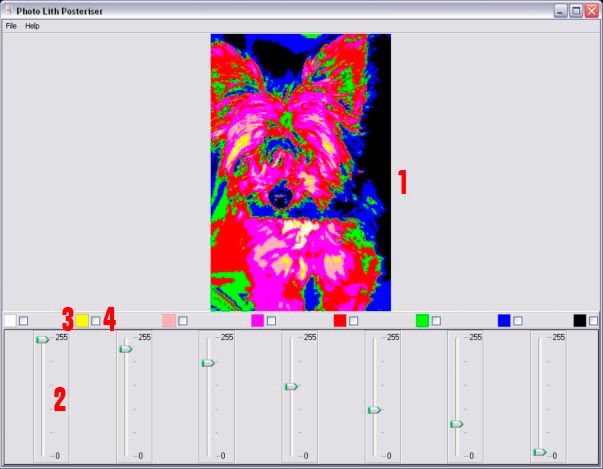
Here is a picture of the user interface for
Photo Lith Posteriser.

1 - The posterised image produced by the program,
clicking this will toggle between the posterised image and
the original image.
2 - The sliders used to set the thresholds for the colours.
A slider must always be equal to or higher than the slider
to its right, if a slider passes another one the other will
move to the same value as the one moved.
3 - The colour that will be displayed for all pixels with
a brightness between the values set by the sliders on either
side. Clicking on the colour patch will open a colour chooser
dialog to allow the selection of any colour.
4 - If this box is checked the original image pixel values
will be displayed for brightnesses between the sliders rather
than the colour of the patch.
The File menu contains options to open and save
images and to exit the program. The Help menu gives access
to the Help system along with the License agreement and a
link to this web site.
[Top of page]
4. Photo Lith - Black & White
4.1 What are the controls for Photo
Lith - Black & White?
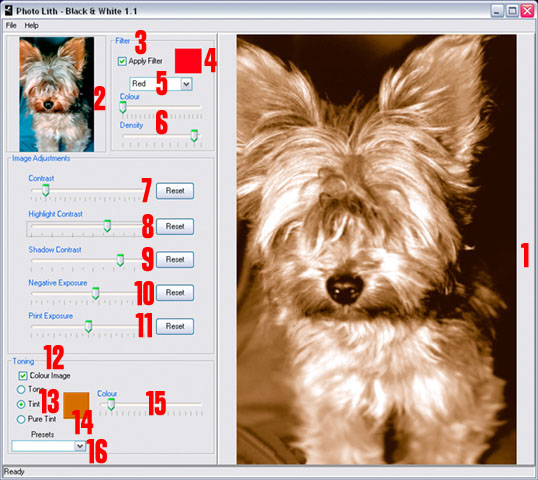
Here is a picture of the user interface for
Photo Lith - Black & White.

1 - The black and white image produced by the
program.
2 - The original image being processed.
3 - The pre-filtering checkbox, if this is ticked the filter
will be applied.
4 - This gives an indication of the colour of the filter that
will be applied.
5 - A drop-down list of preset coloured filters.
6 - Sliders that are used to adjust the colour and density
of the filter to be applied.
7 - The slider used to alter the overall contrast of the image,
the Reset button will set this back to the default setting.
8 - The slider used to alter the highlight contrast of the
image, the Reset button will set this back to the default
setting.
9 - The slider used to alter the shadow contrast of the image,
the Reset button will set this back to the default setting.
10 - A slider used to alter the brightness of the image, this
works in a similar way to altering the exposure in the camera
when taking conventional photographs. The Reset button will
set this back to the default setting.
11 - A slider used to alter the brightness of the image, this
works in a similar way to altering the exposure in the enlarger
when printing conventional photographs. The Reset button will
set this back to the default setting.
12 - The toning checkbox, if this is ticked the final image
will be coloured.
13 - The toning type radio buttons.
14 - This gives an indication of the colour that the final
image will be toned.
15 - Sliders used to alter the colour that the image will
be toned. When Tone is selected there are two sliders, one
for Colour and one for Density. When Tint and Pure Tint are
selected only the Colour slider is available.
16 - A drop-down list of preset colours for toning.
[Top of page]
4.2 How do I create a sepia toned image
with Photo Lith - Black & White?
There is no preset for a sepia tone as everyone
has their own idea of what sepia is. The simplest way to produce
this is as follows
1. Tick the Toning checkbox.
2. Select the Tint radio button.
3. From the preset list select Yellow.
4. Move the Colour slider towards the left slowly until you
get the required colour.
[Top of page]
|

